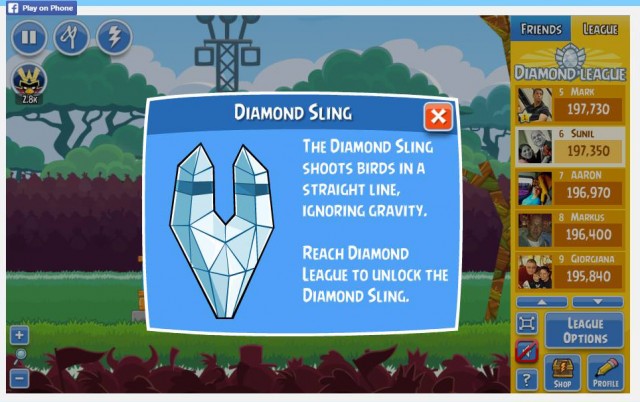
Search Results for 'slingshot'

Home Forums Search Search Results for 'slingshot'

Viewing 25 results - 876 through 900 (of 957 total)
  • Author
    Search Results
  • #91498
    sal9
    Participant

    @stosh

    1- To be promoted to the upper league, you must achieve a score that will place you in the upper ranks of your league. A green arrow is shown next to the names that will move up. The same applies for demotions, a red arrow is displayed next to the bottom names.

    2- The number of people that move up or down depends on the number of players in the league. We do not have access to the formula behind that process.

    3- Rovio seems to monitor cheaters, and kick them out of leagues occasionally. No official word on that.

    4- We have ways to determine maximum scores for each level, and only legitimate scores are approved. That is two power-ups + any slingshot per level.

    #90860
    burbman
    Participant

    You placed 25th in a random grouping of Diamond level players, and dropped 14 points, which is still 67 points above the floor for the Diamond league and somehow you believe you are entitled to your money back? You have not lost anything! So you spent real world money on power ups in a game with no real world value, chalk it up to entertainment value and move on with a lesson learned. They are not going to take away that fancy slingshot you earned.

    #90543
    ABGoFast
    Participant

    @alcusto @phoenix6 @janmej @platium @oldschool @nacho18 @wazemank @jorge-freeman-1 @stevep

    Has anyone else tried single multi-player tonight/today? Instead of racing against 3 others, my races are exactly like team multi-player — 6 total racers and I’m opponents against all of them. Even though the players selected are 2 members of our team, myself and 3 opponents. Then…like that glitch that happened on Sub Zero Track … half the group gets half way done the race before my kart leaves the slingshot. Dear me Rovio. What the heck have you done to this game? It’s crapping out.


    @stevep
    — welcome aboard … I didn’t see it coming either. Very thankful you found us and are now a permanent member of our team


    @wazemank
    — last time I shared messages with Phoenix, the game isn’t allowing him to play team multiplayer … he can’t even access the team he setup right now

    #89348
    Viking
    Participant

    Thank you @hooksfan, I wonder if that goes for earning the new Gold League and Diamond League slingshots. Or do they go away if you drop down? Thanks again for the input!

    #89233

    In reply to: Diamond Sling

    sal9
    Participant

    The new Slingshots were officially released yesterday. Anyone claiming to have received them before that was simply using a hacked version of the game. There is no lag.

    Read all about it here: https://www.angrybirdsnest.com/chinese-new-year-updaets-for-angry-birds-epic-go-plus-friends/#friends

    #87698
    Fleshyskeleton
    Participant

    @e-star @kathy and whoever’s in charge of the contest:
    Thanks for the nomination,I’m pleasantly surprised you find the picture interesting as well.
    The soldiers depicted in the avatar are French,with a text saying”grenadier drills” beneath in French.I never accepted all the stuff Americans kept forwarding about “surrender”.The French are valiant and well armed,they just suffer from inferior tactics(eg.unable to cope with VC’s ambushes)
    And after all,a slingshot for firing grenades,though peculiar,do have an advantage over throwing,as the PLA always did(no grenade launchers).
    I find others’ avatars far more pleasant myself,more importantly,they are colorful and well-designed.And I wonder if there are fan art sites from which to obtain the pictures,or you designed them yourselves,like @sal-9 ?

    #87585
    E-Star
    Participant

    @kathy great to see you pop in, I have added @fleshyskeleton’s avy to the list of nominees. I searched Google and it is mentioned in a list of the strangest weapons of WWI, it’s a slingshot! Here is a bigger image.

    #87514
    sal9
    Participant

    Just got a pm with this image, new slingshot that unlocks in the diamond league. Has anyone been able to use it?

    Diamond Sling


    @admins

    #83836
    karen68
    Participant

    @dr-omega try a reduced power shot. Aim towards the right half of the gravity field so only a dot or two of the tracking line actually enters the field. At reduced speed it will loop around & straight into the line of pigs.
    Took me a lot of tries to fine-tune the power & aim.
    There is a bright star between the slingshot & grav field on mine, I aim just to the right of it.

    Trajectory –
    https://www.angrybirdsnest.com/members/karen68/album/picture/12623/

    DaffyD
    Participant

    All the work I have done this week is gone. I was on the gold level. All the extra energy, slingshots, shakem’ups, and other helps I purchased are gone. I have tried to get them back, but no dice. What has happened? Please don’t say I was cheating,because I don’t know how. I am 71 and am not likely to understand how even if I were shown. I am just not interested anyway.

    Please fix my page. I think maybe people are cheating, but from the points I have been able to tally, most of the points look achievable. It does take many years of practice and a goal of getting three stars on every game. At least that is what I did. I happened to get the top score on on level last week. I kind of wish there were two groups within the leagues: one where no exta helps are used and one where they are not.

    Sincerely, DaffyD

    #80171
    Viking
    Participant

    Hello,

    First off I apologize if this has been asked before but I searched and I didn’t find any specific information regarding comparisons between slingshots. Of course, there is information on what each slingshot does but not so much in comparison to one another.

    I was fortunate to pick up the Wishbone when it as available. I want to know are there are any differences between Golden and Wishbone? If so, what are they?

    Next, I also have the Stone Crusher slingshot and the Jingle Slingshot. I understand the benefits of both but how does the Wishbone compare to the Stone Crusher when it comes to damaging stones? For example, if there is a level with a little of everything on it, the Wishbone is by far the best because it does extra damage to all materials. However, if the level was all stone blocks, would it be better to use the Stone Crusher or is the Wishbone also better in this situation?

    Hypothetically, lets say that the Wishbone does 2x damage to all materials including stones. Is it safe to say that the following is true:

    Stone Crusher = 2x damage to stones
    Wood Chipper = 2x to wood
    Glass Smasher = 2x damage to glass

    Or is it more like this:

    Wishbone = 1.5x damage to all materials
    Stone Crusher = 2x damage to stones
    Wood Chipper = 2x to wood
    Glass Smasher = 2x damage to glass

    I don’t want to buy the Golden Slingshot if it is not worth it since I have the Wishbone. And strategically I want to know if it is worth while to switch between the other slingshots or if the Wishbone should be my only slingshot from now on. Thank you for taking the time to read my post and I appreciate any assistance you can offer regarding this topic.

    #79691

    In reply to: Create Your Own Enemy

    Imitator (Health: 15000)- An example of a near-invincible enemy. Since the Imitator copies target birds, the Imitator has no level or mastery level.

    Mimic: Charge 2 turns-Copies target bird’s appearance, health, attack power, and abilities; lasts 3 turns.

    Health Drain: Charge 2 turns-Decreases maximum health of all birds by 40%; lasts 4 turns.

    Passive: Allied pigs will take on the same form as the Imitator for 2 turns after Mimic is used.

    The Imitator will look like a magician pig like the Necromancer or the Nature Pig but with a hat from Chuck’s Mage-Class. He will hold a Slingshot similar to the set-item the Blues can carry. If the Imitator has used Mimic, Health Drain cannot be used. Once the Imitator is in his regular pig form, he can use Health Drain. If he is attacked while mimicking a target bird and his mimicked health is lowered to 0, the Imitator will resume his original pig form; only then can he be attacked and killed.

    #79399

    In reply to: slingshot activation

    AMslimfordy
    Participant

    I’m the top-left of the screen, you should see a few buttons. One of them is “||” (pause), for example.

    Look for one that looks like a slingshot. You can change slingshots as often as you’d like.

    #79391
    Famleman
    Participant

    I have purchased 2 of the optional slingshots, I don’t know how to activate them, how do I get them to show up?? I thought they would automatically show up once the purchase was completed, but all that happens is they don’t show a buy sign on them in the slingshot window. I’m an old guy of 54, but I can’t figure it out,any help would be appreciated. :-) thanks in advance!

    #77992
    Arus73
    Participant

    Grand Master racer @phoenix6
    Here is my update on our team challenge:

    – 77 trophies won
    – 13 wins in a row (https://www.angrybirdsnest.com/members/alcusto/album/picture/12148/ to be viewed starting from down going up; you will note how much my teammates suck as there is no 18 GEs victory in there)

    I should add that all of my victories were achieved without using any p-ups and any additional special power which is my personal self-imposed philosophy on this game. I know you allowed the use of p-ups due to teammates’ ghosts from previous weeks using them. However, I’m also facing my own teammates and opponents using p-ups/extra special powers, but I do not care and I try to exceed my skills to win.


    @wazemank

    Firts off, congrats for your 20k GEs, which is frankly amazing. Secondly, in my personal experience with the weekly challenge, if you do not pass all 5 challenges you will not be given any prize at all even if you are in 1st position. It happened to me twice in the past.


    @janmej

    Regarding the ice cone challenge, I started from the slingshot at the 1, not the Go!, in order to make a small spin and land on the head of one of the two piggies (I have noted with this game that the faster you start off on a race, the faster become the opponents, so it is better to start slow in order to have slower opponents and make it easier to hit them). This way I could save the lightning for later on the race. It’s not easy though. If they manage to skip you, unleash the lightning asap to stop them.
    The crucial point of this challenge is the last slope before the end where several groups full of fruits are scattered around. You must try your best to aim first to the very left without flying too high and after getting that initial group of fruits, head immediately to the right and try getting at least other two or three groups. It is tough but doable. Good luck!

    #77435
    Anonymous
    Inactive

    I think it would be great if King Sling WAS a specialized sling. Like if they remove the power-up and add it as a slingshot in the store.

    #66432
    Les Toreadors
    Participant

    Hahaha @jkhab69 I like @kelani’s puns. They are very punny :) Did you see the Pig Bang theory on page 1?

    Hey @kelani, guess what my final entry for the Birdday event is?

    It’s entitled “An Oink Too Far“, featuring an historical account of Operation Brisket Garden, based on a #TrueStoryBro!

    Background:

    A few months after the infamous Bay of Pigs Invasion, the Bad Piggies seek to push deep into the heart of Angry Birds territory by mounting the largest chairborne operation in history. The 202nd Chairborne Infantry Division will conduct (ch)airdrops close to the Arnham and Njibacon bridges in the Netherhams, bypassing the majority of defensive Angry Birds slingshots situated on the Western Front.

    The XXth Panzerkampfbacon Division will break through behind Angry Bird lines and link up with the air-deployed chairborne pigs (who said pigs can’t fly? they have rock-it lawn chairs on my youtube channel :3), then push onwards into the Birds’ heartlands. They claim they will enjoy roast turkey by Thanksgiving!

    Historical Outcome:

    Operation Brisket Garden proved to be less of a success than anticipated, as heavy Panzerkampfbacons (armored fighting bacons) bogged down in soft polders and were restricted to a single road for their entire advance.

    Further, heavier than expected resistance around Njibacon and Arnham proved to be a major hindrance to lightly armed chairborne forces, which got bogged down in house to house slingshot combat, and subsequently failed to capture the bridges in time before they were demolished.

    Thus cut off from reinforcements until the XXth Division erected pontoon bridges, the chairborne pigs were summarily dispatched by the Angry Bird defenders. At Oosterbeak, the drop zone key to the success of the Njibacon Bridge effort, was overrun by The Blues, preventing crucial resupply to the attacking piggies.

    Elements of the 303rd Hainanese Chicken Rice Regiment, although greatly outnumbered in the opening days of the operation, successfully held their ground despite the lack of Bomb and Chuck support. Once heavy Bombs and long-range hyper-velocity Chucks were committed in-theatre, the defending Angry Birds successfully fought the invading Pigs to a standstill in the vicinity of Arnham, preventing further advances by bacon forces until late in the Second Pig War.

    Writer’s note:

    Adapted from Operation Market Garden, 1944.
    http://en.wikipedia.org/wiki/Operation_Market_Garden

    #66147

    In reply to: AB Star Wars 2

    grammyK
    Participant

    Lol @rzn83 , i am still having a hard time remembering the charaters and what they do . Getting a printer soon to help with that. This gramma sometimes having trouble remembering 4 grandkids info :-

    After finishing Stella and landing in the 300s on gc, and calculating it would cost a couple of thousand to get higher ! I was back in angry birds mode so went back to absw2 which I found too difficult before. I hadnt used the characters so had a couple of hundred built up. So i used a few of them to just pass a couple of levels i was stuck on. Then when i had 3*d most of the levels and looked at our scores i realized the biggest point push was to open up all the bonus character levels and each would net 100k on average rather than a few k for a better score. So i spent a couple of days gathering missed coins then started working on the needed characters. ran out of coins with about 7 characters to go so did some math and 50$ of coins was enough to get them.

    Used level 4. Rise of clones/ pork/s2 to rack up character points for many of them, better than 1/birds/10 as recommended for many.

    So i havent used many character swaps really yet, so enjoying learning them now to better a few scores :-)

    I did spend 5 bucks for a slingshot in ab friends so this was the second time i spent money. Didn’t mind at all as rovio has given me years of great entertainment available for free ! :-)

    #61463
    calvin
    Participant

    I much like the game when the slingshots added, its one that gives me interest laying it.. just like a stacking physics games that I used to play at http://www.iphysicsgames.com/stacking, also enjoyable.

    #60890
    dbkraemer
    Participant

    @abgofast, @philhayler, @nacho18, @platium, @wazemank, @grimmjow, @angryde, @alcusto, @pba2014, @aftarquino, @abgoria, @cholewap, @kamenev-spbgma, @leonardo-peixot

    Not sure if this is new or if it has been mentioned/discovered before, but this will probably be of special interest to @nacho18:

    Stella seems to work wonderfully for the “Completely trash 3 opponents” challenges. So far it has worked on Seedway and on Air. Not sure about the other tracks because I haven’t run across the need to try it on them yet.

    Try to get just behind a pack of racers. This often happens if you miss landing on an opponent from the slingshot, but you can also try to do this on purpose. Once you are close behind the pack, use Stella’s special power. This surrounds her with the bubble, but more importantly, it lifts your kart slightly off the ground. Her bubble hits the opponent in the head and knocks him off his racer, completely trashing him.

    I’d love to hear if this works for anyone else, and again, my apologies if this is an already know method.

    Keep going fast!!! Except for @abgofast. (Did I say that out loud or was I just thinking it?) :D

    #60031

    In reply to: Blueprint Guide

    seggy
    Participant

    Forgotten Bastion:

    Red’s Feather Sword (Wheel: Forgotten Bastion – 1) – [Att: 167] 16 Cobalt Stone, 14 Wood, 12 Flotsam
    Chuck’s Book of Love (Wheel: Forgotten Bastion – 2) – [Def: 438] 16 Paper, 14 Stone, 12 Flotsam
    Matilda’s Cobalt Pan (Wheel: Forgotten Bastion – 3) – [Att: 167] 16 Slingshot Twig, 14 Stone, 12 Flotsam
    Bomb’s Wooden Talisman (Wheel: Forgotten Bastion – 4) – [Def: 729] 16 Fossil, 14 Wood, 12 Flotsam
    Blues’ Plunger Bow (Wheel: Forgotten Bastion – 5) – [Att: 271] 16 Rainbow Shell, 14 Wood, 12 Flotsam
    Red’s Fence Shield (Wheel: Forgotten Bastion – 6) – [Def: 873] 16 Squarewood, 14 Stone, 12 Flotsam
    Chuck’s Seashell Staff (Wheel: Forgotten Bastion – 7) – [Att: 249] 16 Fossil, 14 Stone, 12 Flotsam
    Matilda’s Flower Basket (Wheel: Forgotten Bastion – 8) – [Def: 676] 16 Seastar, 14 Stone, 12 Flotsam
    Bomb’s Boxing Glove (Wheel: Forgotten Bastion – 9) – [Att: 271] 16 Rainbow Shell, 14 Stone, 12 Flotsam
    Blues’ Party Horn (Wheel: Forgotten Bastion – 10) – [Def: 550] 16 Fossil, 14 Stone, 12 Flotsam

    #59307
    MysticalFire
    Participant

    Zack Scott uses priest. Priest is only good with a paladin and/or RAINBIRD.

    For cave 5, use Druid, Samurai and Marksmen. MAKE SURE THEY ARE ALL AT LEAST LV. 22 AND ARE ELITE, OR HAVE AT LEAST 800 Health. Target the Mandarins and Master Ninjas first. For Shogun use Blues/Reds Rage Chili Ability (having a friend who has Yin and Yang will help). Always start every round with max health and max chili. Do not be afraid to heal – health is essential. Focus on one target. That should work. I did this LV. 21-22, no legendary items.

    WEAPONS: Use a hammer for Red, Slingshot for Blues, and Comb or Harp for Matilda.
    NEVER, EVER USE A CRITICAL HIT WEAPON DUE TO DODGE. If you plan to use legendary weapons, use Yin or Scythes for Matilda, Gold Hammer or Dragon’s Tooth for Red and Robot or Slingshot for Blues.

    #58467

    In reply to: Blueprint Guide

    seggy
    Participant

    Filling in a bunch of holes. I’m 100% certain of these, except for 4 resources lists in Rain Plateaus, which I’ve marked with “Probably.” I’m pretty sure of them, though, because when listed like they are below, you can see the pattern of both resources and attack values. Hope this helps!

    Red’s Peace Banner (Wheel: Rain Plateaus – 1) – [Def: 573] (Probably 12 Bamboo, 10 Seashell, 8 Flotsam)
    Chuck’s Twiggy Wand (Wheel: Rain Plateaus – 2) – [Att: 165] 12 Seastar, 10 Wood, 8 Flotsam
    Matilda’s Cheese Doll (Wheel: Rain Plateaus – 3) – [Def: 443] (Probably 12 Limestone, 10 Wood, 8 Flotsam)
    Bomb’s Banana Bomb (Wheel: Rain Plateaus – 4) – [Att: 178] 12 Corals, 10 Wood, 8 Flotsam
    Blues’ Clubs: (Wheel Rain Plateaus – 5) – [Def: 362] (Probably 12 Paper, 10 Seashell, 8 Flotsam)
    Red’s Diver Hammer (Wheel: Rain Plateaus – 6) – [Att: 108] 12 Squarewood, 10 Stone, 8 Flotsam
    Chuck’s Glitter Ball (Wheel: Rain Plateaus – 7) – [Def: 286] (Probably 12 Cobalt Stone, 10 Wood, 8 Flotsam)
    Matilda’s Shell Comb (Wheel: Rain Plateaus – 8) – [Att: 108] 12 Metal Bar, 10 Seashell, 8 Flotsam
    Bomb’s Royal Parchment (Wheel: Rain Plateaus – 9) – [Def: 457] 12 Paper, 10 Seashell, 8 Flotsam
    Blues’ Cushioned Boomerang (Wheel: Rain Plateaus – 10) [Att: 178] 12 Limestone, 10 Seashell, 8 Flotsam

    Red’s Star Lance (Wheel: Misty Hollow – 1) – [Att: 119] 14 Bamboo, 12 Seashell, 10 Flotsam
    Matilda’s Strapped Harp (Wheel: Misty Hollow – 2) – [Att: 119] 14 Squarewood, 12 Seashell, 10 Flotsam
    Chuck’s Scroll (Wheel: Misty Hollow – 3) – [Def: 314] 14 Paper, 12 Stone, 10 Flotsam
    Bomb’s Golden Talisman (Wheel: Misty Hollow – 4) – [Def: 522] 14 Fossil, 12 Wood, 10 Flotsam
    Blues’ Y-Sling (Wheel: Misty Hollow – 5) – [Att: 195] 14 Slingshot Twig, 12 Stone, 10 Flotsam
    Red’s Bamboo Shield (Wheel: Misty Hollow – 6) – [Def: 627] 14 Squarewood, 12 Stone, 10 Flotsam
    Chuck’s Fuzzy Broom (Wheel: Misty Hollow – 7) – [Att: 180] 14 Rainbow Shell, 12 Wood, 10 Flotsam
    Matilda’s Fruit Bag (Wheel: Misty Hollow – 8) – [Def: 485] 14 Seastar, 12 Stone, 10 Flotsam
    Bomb’s Plunger Gun (Wheel: Misty Hollow – 9) – [Att: 195] 14 Ore, 12 Seashell, 10 Flotsam
    Blues’ Hunting Horn (Wheel: Misty Hollow – 10) – [Def: 395] 14 Fossil, 12 Stone, 10 Flotsam

    Red’s Love Banner (Wheel: Cure Cavern – 1) – [Def: 681] 14 Bamboo, 12 Seashell, 10 Flotsam
    Chuck’s Horn Staff (Wheel: Cure Cavern – 2) – [Att: 195] 14 Fossil, 12 Stone, 10 Flotsam
    Matilda’s Pineapple Doll (Wheel: Cure Cavern – 3) – [Def: 529] 14 Limestone, 12 Wood, 10 Flotsam
    Bomb’s Glove Puppet (Wheel: Cure Cavern – 4) – [Att: 210] 14 Rainbow Shell, 12 Stone, 10 Flotsam
    Blues’ Feather Cards (Wheel: Cure Cavern – 5) – [Def: 430] 14 Paper, 12 Seashell, 10 Flotsam
    Red’s Wooden Sabre (Wheel: Cure Cavern – 6) – [Att: 130] 14 Cobalt Stone, 12 Wood, 10 Flotsam
    Chuck’s Christmas Bulb (Wheel: Cure Cavern – 7) – [Def: 340] 14 Cobalt Stone, 12 Wood, 10 Flotsam
    Matilda’s Hot Pot (Wheel: Cure Cavern – 8) – [Att: 130] 14 Slingshot Twig, 12 Stone, 10 Flotsam
    Bomb’s Jungle Map (Wheel: Cure Cavern – 9) – [Def: 545] 14 Paper, 12 Seashell, 10 Flotsam
    Blues’ Clamp Bow (Wheel: Cure Cavern – 10) – [Att: 210] 14 Rainbow Shell, 12 Wood, 10 Flotsam

    Red’s Bell Hammer (Wheel: Burning Plain – 1) – [Att: 145] 16 Squarewood, 14 Stone, 12 Flotsam

    #57290
    Squeaky McGee
    Participant

    This is a list of the craftable items in the game. It’s not complete – I’ve got one game at level 25 and another at level 6, so it’s missing many of the mid-level items. It does have every item available for sale at workshops, as well as almost every item found in the Chronicle Caves (Though I can’t necessarily say which cave each came from. I wish I’d written that down as I was doing them.) Also blueprints found in Chests are probably mostly missing. If you can fill in any of the information, let me know in the comments and I’ll add it to this list. If you have the items but forget where you got them, that’s okay too, just only mention it if you’ve got 3 stars on them. These are the max values listed.

    (Note that this does NOT include items that can only be gotten from the Golden Pig Machine. I have no idea how many of those there are, but it’s too many. This only lists items you can craft at the Forge.)

    Red
    Lances

    • Fork Lance (Free with Forge: Cobalt Plateaus – 4) – [Att: 26] 6 Wood, 4 Seashells, 2 Flotsam
    • Shell Lance (Workshop: Western Slingshot Woods) – [Att: 56] 8 Bamboo, 6 Seashells, 4 Flotsam
    • Feather Lance (Workshop: Old Nesting Barrows – 2) – [Att: 93] 12 Bamboo, 10 Seashells, 8 Flotsam
    • Star Lance (Wheel: Misty Hollow – 1) – [Att: 119] 14 Bamboo, 12 Seashells, 10 Flotsam

    Hammers

    • Cobalt Hammer (Workshop: Matilda’s Garden) – [Att: 37] 6 Wood, 4 Stone, 2 Flotsam
    • Duck Hammer (Chest: Star Reef – 3) – [Att: 63] 8 Wood, 6 Stone, 4 Flotsam
    • Diver Hammer (Workshop: Red Giant Valley – 2) – [Att: 104] 12 Squarewood, 10 Stone, 8 Flotsam
    • Diver Hammer (Workshop: Rain Plateaus – 6) – [Att: 108] ? Squarewood, ? Stone, ? Flotsam
    • Bell Hammer (Wheel: ?) – [Att: 145] 16 Squarewood, 14 Stone, 12 Flotsam

    Swords

    • Stick Sword (Workshop: Limestone Lagoon – 5) – [Att: 48] 8 Cobalt Stone, 6 Wood, 4 Flotsam
    • Paper Sword (Workshop: Islands in the Sky – 1) – [Att: 78] 7 Cobalt Stone, 6 Wood, 4 Flotsam
    • Cobalt Sword (Wheel: Shaking Hall – 1) – [Att: 100] 12 Cobalt Stone, 10 Wood, 8 Flotsam
    • Wooden Saber (Wheel: Cure Cavern – 6) – [Att: 130] 14 Cobalt Stone, 12 Wood, 10 Flotsam

    Shields

    • Lid Shield (Workshop: Cobalt Plateaus – 8) – [Def: 165] 6 Wood, 4 Stone, 2 Flotsam
    • Tire Shield (Workshop: Great Cliffs – 3) – [Def: 327] 8 Wood, 6 Stone, 4 Flotsam
    • Bamboo Shield (Wheel: Misty Hollow – 6) – [Def: 327] 14 Squarewood, 12 Stone, 10 Flotsam
    • Leaf Shield (Workshop: Old Nesting Barrows – 2) – [Def: 492] 12 Squarewood, 10 Stone, 8 Flotsam
    • Leaf Shield (Workshop: Shaking Hall – ?) – [Def: 519] ? Squarewood, ? Stone, ? Flotsam
    • Egg Shield (Wheel: Burning Plain – 6) – [Def: 765] 16 Squarewood, 14 Stone, 12 Flotsam

    Banners

    • Shell Banner (Workshop: Eastern Desert Island) – [Def: 273] 8 Wood, 6 Seashells, 4 Flotsam
    • Star Banner (Workshop: Winter Wonderland – 1) – [Def: 381] 10 Bamboo, 8 Seashells, 6 Flotsam
    • Peace Banner (Wheel: ?) – [Def: 573] 12 Bamboo, 10 Seashells, 8 Flotsam
    • Love Banner (Wheel: Cure Cavern – 1) – [Def: 681] 14 Bamboo, 12 Seashells, 10 Flotsam

    Chuck
    Wands

    • Star Wand (Workshop: Limestone Lagoon – 5) – [Att: 69] 8 Seashells, 6 Wood, 4 Flotsam
    • Stick Wand (Workshop: Moorlands – 2) – [Att: 132] 10 Seastars, 8 Wood, 6 Flotsam
    • Multi Star Wand (Wheel: Burning Plain – ?) – [Att: 219] 16 Seastars, 14 Wood, 12 Flotsam

    Brooms

    • Feather Broom (Workshop: Matilda’s Garden) – [Att: 54] 6 Seashells, 4 Wood, 2 Flotsam
    • Sponge Broom (Workshop: Bamboo Forest – 7) – [Att: 102] 10 Seashells, 8 Wood, 6 Flotsam
    • Fuzzy Broom (Wheel: Misty Hollow – 7) – [Att: 180] 14 Rainbow Shells, 12 Wood, 10 Flotsam

    Staves

    • Crystal Staff (Workshop: Western Slingshot Woods) – [Att: 87] 8 Fossils, 6 Stone, 4 Flotsam
    • Bubble Staff (Workshop: King Pig’s Castle) – [Att: 141] 12 Fossils, 10 Stone, 8 Flotsam
    • Horn Staff (Wheel: ?) – [Att: 195] 14 Fossils, 12 Stone, 10 Flotsam

    Scrolls/Books

    • Scroll (Chest: Eastern Cobalt Plateaus – 1) – [Def: 108] 6 Wood, 4 Stone, 2 Flotsam
    • Book of Love (Workshop: Eastern Desert Island) – [Def: 135] 8 Paper, 6 Stone, 4 Flotsam
    • Dark Book (Workshop: Winter Wonderland – 1) – [Def: 192] 10 Paper, 6 Stone, 4 Flotsam
    • Stone Tablet (Workshop: Red Giant Valley – 2) – [Def: 273] 12 Paper, 10 Stone, 8 Flotsam
    • Scroll (Wheel: Misty Hollow – 2) – [Def: 314] ? Paper, ? Stone, ? Flotsam
    • Mystery Book (Wheel: Shaking Hall – 2) – [Def: ?] ? Paper, ? Stone, ? Flotsam
    • Purple Book (Wheel: ?) – [Def: 381] 16 Paper, 14 Stone, 12 Flotsam

    Orbs/Spheres

    • Cobalt Orb (Workshop: Cobalt Plateaus – 8) – [Def: 81] 6 Cobalt Stone, 4 Wood, 2 Flotsam
    • Skull Orb (Workshop: Great Cliffs – 3) – [Def: 165] 8 Cobalt Stone, 6 Wood, 4 Flotsam
    • Skull Orb (Chest: Mouth Pool) – [Def: 273] 12 Cobalt Stone, 10 Wood, 8 Flotsam
    • Glitter Ball (Wheel: Rain Plateaus – 7) – [Def” ?] ? Cobalt Stone, ? Wood, ? Flotsam
    • Christmas Bulb (Wheel: ?) – [Def: 340] 14 Cobalt Stone, 12 Wood, 10 Flotsam

    Bomb
    Gloves

    • Red Fist (Chest: Limestone Lagoon – 2) – [Att: 83] 8 Seashells, 6 Stone, 4 Flotsam
    • Balooned Glove (Workshop: Moorlands – 2) – [Att: 143] 10 Seashells, 8 Stone, 6 Flotsam
    • Iron Fist (Wheel: Shaking Hall – 9) – [Att: 160] – 12 Rainbow Shells, 10 Stone, 8 Flotsam
    • Glove Puppet (Wheel: Cure Cavern – 4) – [Att: 210] 14 Rainbow Shells, 12 Stone, 10 Flotsam

    Bombs

    • Water Bomb (Workshop: Slingshot Woods – 1) – [Att: 93] 8 Seashells, 6 Wood, 4 Flotsam
    • Rocket Surprise (Workshop: King Pig’s Castle) – [Att: 153] 12 Corals, 10 Wood, 8 Flotsam
    • Banana Bomb (Wheel: Rain Plateau – 4) – [Att: 178] 12 Corals, 10 Wood, 8 Flotsam
    • Bamboo Bomb (Wheel: Burning Plain – 9) – [Att: 236] 16 Corals, 14 Wood, 12 Flotsam

    Guns

    • Funnel Gun (Workshop: Bamboo Forest – 7) – [Att: 108] 10 Ore, 8 Seashells, 6 Flotsam
    • Plunger Gun (Wheel: ?) – [Att: 195] 14 Ore, 12 Seashells, 10 Flotsam

    Charms

    • Jungle Charm (Workshop: Limestone Lagoon – 5) – [Def: 206] 4 Flotsam, 6 Stone, 2 Fossils
    • Wooden Mojo (Workshop: Islands in the Sky – 1) – [Def: 340] 10 Fossils, 8 Wood, 6 Flotsam
    • Golden Talisman (Wheel: Misty Hollow – 4) – [Def: ?] ? Fossils, ? Wood, ? Flotsam
    • Cobalt Talisman (Wheel: ?) – [Def: 637] 16 Fossils, 14 Wood, 12 Flotsam

    Maps/Papers

    • Crinkly Map (Chest: Star Reef – 6) – [Def: 261] 8 Paper, 6 Seashells, 4 Wood
    • Pencil Memo (Workshop: Old Nesting Barrows – 6) – [Def: 392] 12 Paper, 10 Seashells, 8 Flotsam
    • Jungle Map (Wheel: ?) – [Def: 545] 14 Paper, 12 Seashells, 10 Flotsam
    • Royal Parchment (Wheel: Rain Plateaus – 8) – [Def: ?] ? Paper, ? Seashells, ? Flotsam

    Matilda
    Combs

    • Flower Comb (Chest: Golden Fields – 2) – [Att: 41] 8 Stone, 6 Seashells, 4 Flotsam
    • Pink Comb (Workshop: Bamboo Forest – 1) – [Att: 67] 10 Stone, 8 Seashells, 6 Flotsam
    • Shell Comb (Wheel: Rain Plateaus – 8) – [Att: 108] 12 Metal Bars, 10 Seashells, 8 Flotsam
    • Jaw Comb (Wheel: Burning Plain – 3) – [Att: 145] 16 Metal Bars, 14 Seashells, 12 Flotsam

    Pans

    • Wok o’ Whonk (Workshop: Slingshot Woods – 1) – [Att: 56] 8 Slingshot Wood, 6 Stone, 4 Flotsam
    • Round Ladle (Workshop: Old Nesting Barrows – 6) – [Att: 93] 12 Slingshot Wood, 10 Stone, 8 Flotsam
    • Hot Pot (Wheel: Misty Hollow – 3 or 4?) – [Att: 130] 14 Slingshot Wood, 12 Stone, 10 Flotsam

    Harps

    • Twig Harp (Workshop: Moorlands – 2) – [Att: 89] 10 Wood, 8 Seashells, 6 Flotsam
    • Strapped Harp (Wheel: ?) – [Att: 119] 14 Square Wood, 12 Seashells, 10 Flotsam

    Dolls

    • Voodoo Doll (Workshop: Eastern Desert Island) – [Def: 210] 8 Limestone, 6 Wood, 4 Flotsam
    • Pig Doll (Workshop: Winter Wonderland – 1) – [Def: 297] 10 Limestone, 8 Wood, 6 Flotsam
    • Cheese Doll (Wheel: Rain Plateau – 3) – [Def: 443] 12 Limestone, 10 Wood, 8 Flotsam
    • Pineapple Doll (Wheel: Cure Cavern – 3) – [Def: 529] 14 Limestone, 12 Wood, 10 Flotsam

    Handbags

    • Purple Handbag (Workshop: Great Cliffs – 3) – [Def: 255] 8 Seashells, 6 Stone, 4 Flotsam
    • Foliage Handbag (?) – [Def: 402] 12 Seastars, 10 Stone, 8 Flotsam
    • Fruit Bag (Wheel: Misty Hollow – 8) – [Def: 485] 14 Seastars, 12 Stone, 10 Flotsam
    • Beachside Bag (Wheel: Burning Plain – 8) – [Def: 593] 16 Seastars, 14 Stone, 12 Flotsam

    Blues
    Bows

    • Straw Bow (Workshop: Bamboo Forest – 1) – [Att: 108] 10 Seashells, 8 Wood, 6 Flotsam
    • Shell Bow (Wheel: ?) – [Att: 236] 16 Rainbow Shells, 14 Wood, 12 Flotsam

    Slings

    • Fortified Sling (Workshop: Slingshot Woods – 1) – [Att: 143] 8 Slingshot Wood, 6 Stone, 4 Flotsam
    • Accurate Sling (Workshop: King Pig’s Castle) – [Att: 153] 12 Slingshot Wood, 10 Stone, 8 Flotsam
    • Y-Sling (Wheel: Misty Hollow – 5) – [Att: 195] 14 Slingshot Wood, 12 Stone, 10 Flotsam

    Boomerangs

    • Smile o’ Rang (Workshop: Islands in the Sky – 1) – [Att: 128] 10 Limestone, 8 Seashells, 6 Flotsam
    • Cushioned Boomerang (Wheel: Rain Plateaus – 10) [Att: 178] 12 Limestone, 10 Seashells, 8 Flotsam

    Cards

    • Orange Card (Workshop: Western Slingshot Woods) – [Def: 191] 8 Paper, 6 Seashells, 4 Flotsam
    • Clubs (Workshop: Red Giant Valley – 2) – [Def: 343] 12 Paper, 10 Seashells, 8 Flotsam
    • Clubs (Workshop: Rain Plateaus – 5) – [Def: 362] ? Paper, ? Seashells, ? Flotsam
    • Feather Cards – [Def: 430] 14 Paper, 12 Seashells, 10 Flotsam

    Horns

    • Cornu Labium (Workshop: Bamboo Forest – 1) – [Def: 223] 10 Fossils, 8 Stone, 6 Flotsam
    • Twin Horn (Workshop: Old Nesting Barrows – 6) – [Def: 310] 12 Fossils, 10 Stone, 8 Flotsam
    • Coral Horn (Chest on Wheel: Shaking Hall – 10) – [Def: ?] ? Fossils, ? Stone, ? Flotsam
    • Hunting Horn (Chest on Wheel: Misty Hollow – 10) – [Def: 395] 14 Fossils, 12 Stone, 10 Flotsam

    Note: We’re getting conflicting reports on the locations of some of the higher level items. It may be they’re different depending on which version of the game you’re playing, or it may be randomized for everyone. Suffice to say, anything found in the Chronicle Caves or behind Red Doors is possibly suspect and your mileage may vary. Not sure if this applies to other blueprints found in unusual ways, such as from Chest rewards.

    #57189
    ABGoFast
    Participant

    Okay…I’m back to say give my first review of multi-player. In a word: bizarre

    I very much like the idea…and like many of you iOS users have said already, I also don’t like the execution we’ve got so far. It seems to have no point other than to get a lucky box after 5 wins. It sounds like lucky box won’t be easy to find on the challenge tracks so I’d say this is a big thumbs down.

    I guess it’s good that these multi player wins aren’t “easy” but “very manageable” to get BUT some racers defy logic. It makes no sense to get creamed off the start of a race by a kart with half your CC (especially when using a max’d out kart) and then get a chance to catch them later on. I mean you shouldn’t even have to worry about them based on your equipment match-up. Makes me think I’m not a totally awesome driver. I know that can’t be true :) I feel like it’s a very real possibility that some of these opponent racers are simulations of driver’s races that used power-ups even though there is no indication of the power up on the kart. I did have one of my 7 races so far where a driver used a king sling and you saw the slingshot different than the rest.

    So far no names I recognize for my randomly select opponents :( What is really lame is some “drivers” are using selected in game avatars of like a picture of “Red” but using “King Pig” has the actual driver in the race. Makes it confusing to say the least! I started my thinking I could strategically pick my racer based on the opponent. You really don’t know your opponent’s driver. That would be nice to known. For example, again…small sample of 7 races. I had a race already where we we were all Red! Stupid. There is only one Red and he’s on my race team the rest must be clones … haha

Viewing 25 results - 876 through 900 (of 957 total)