Star Wars 2 Chapter 2 Bird Side

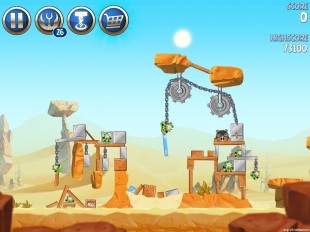
Angry Birds Star Wars 2 Escape to Tatooine Level B2-18 Walkthrough

One non-character swap strategy for Angry Birds Star Wars II Escape to Tatooine level B2-18 is to toss Anakin directly into the nearby TNT, blowing it to bits. The chained helicopter should destroy the...

Categories
Tags
26

Angry Birds Star Wars 2 Escape to Tatooine Level B2-17 Walkthrough

One non-character swap strategy for Angry Birds Star Wars II Escape to Tatooine level B2-17 is to fling Anakin straight ahead, targeting the right side of the left structure before you hit the chained...

Categories
Tags
26

Angry Birds Star Wars 2 Escape to Tatooine Level B2-16 Walkthrough

One non-character swap strategy for Angry Birds Star Wars II Escape to Tatooine level B2-16 is to send Anakin’s Pod Racer into the top of the nearest chain, preferably at a slightly-inclined angle....

Categories
Tags
15

Angry Birds Star Wars 2 Escape to Tatooine Level B2-15 Walkthrough

One non-character swap strategy for Angry Birds Star Wars II Escape to Tatooine level B2-15 is to fling Yoda to barely graze the first two helicopters and onward into the main tower. Yoda should destroy...

Categories
Tags
26

Angry Birds Star Wars 2 Escape to Tatooine Level B2-14 Walkthrough

One non-character swap strategy for Angry Birds Star Wars II Escape to Tatooine level B2-14 is to bounce Qui-Gon Jinn off of the spinning gear and into the TNT beyond. The gear will swing down and destroy...

Categories
Tags
22

Angry Birds Star Wars 2 Escape to Tatooine Level B2-13 Walkthrough

One non-character swap strategy for Angry Birds Star Wars II Escape to Tatooine level B2-13 is to loft Yoda onto the Tusken Chief Pig in the middle of the level. This is a perfect area for Yoda to pinball...

Categories
Tags
5

Angry Birds Star Wars 2 Escape to Tatooine Level B2-12 Walkthrough

One non-character swap strategy for Angry Birds Star Wars II Escape to Tatooine level B2-12 is to fling Yoda to just graze the top of the helicopter. The pinball named Yoda should bounce around the level,...

Categories
Tags
8

Angry Birds Star Wars 2 Escape to Tatooine Level B2-11 Walkthrough

One non-character swap strategy for Angry Birds Star Wars II Escape to Tatooine level B2-11 is to aim Anakin for the helicopter, then redirect the Pod Racer to the nearby structure. Anakin will pull the...

Categories
Tags
10

Angry Birds Star Wars 2 Escape to Tatooine Level B2-10 Walkthrough

One non-character swap strategy for Angry Birds Star Wars II Escape to Tatooine level B2-10 is to crash Anakin’s Pod Racer into the initial pile of pigs. The swinging Anakin should hit the helicopter,...

Categories
Tags
37

Angry Birds Star Wars 2 Escape to Tatooine Level B2-9 Walkthrough

One non-character swap strategy for Angry Birds Star Wars II Escape to Tatooine level B2-9 is to aim Anakin’s Pod Racer into the top of the swinging chain, preferably when it’s swinging left...

Categories
Tags
18

Angry Birds Star Wars 2 Escape to Tatooine Level B2-8 Walkthrough

One non-character swap strategy for Angry Birds Star Wars II Escape to Tatooine level B2-8 is to fling Anakin staight ahead. Once he passes the hanging blocks overhead, redirect the Pod Racer to the tip...

Categories
Tags
39

Angry Birds Star Wars 2 Escape to Tatooine Level B2-7 Walkthrough

One non-character swap strategy for Angry Birds Star Wars II Escape to Tatooine level B2-7 is to arc Anakin high, then direct his Pod Racer into the wooden block just below the highest pig. Anakin should...

Categories
Tags
27

Angry Birds Star Wars 2 Escape to Tatooine Level B2-6 Walkthrough

One non-character swap strategy for Angry Birds Star Wars II Escape to Tatooine level B2-6 is to aim Anakin straight ahead, then redirect his Pod Racer into the top-left bridge. Anakin can swing over to...

Categories
Tags
25