
The Finished Plushie is Oh So Cooooool!
Like many epic stories, it’s often the side characters who become as popular with fans as the main characters, if not moreso. Boba Fett, Agent Phil Coulson, Darth Maul, and Grimlock, to name a few.
To this end, Angry Birds Epic introduced (or re-introduced) a number of new characters with a lot of fun potential. One of my particular favorites is Piggy McCool, merchant character who sells you new equipment, potions and other items. He’s the first Bad Piggy who it seems would rather be a bird.
As a fan of Mr. McCool, I decided to modify one of my plush Pigs into McCool. If you are a fan as well, and want your own plush Piggy McCool, I’ve created the following build guide to help:
Materials Needed:
Equipment Needed:
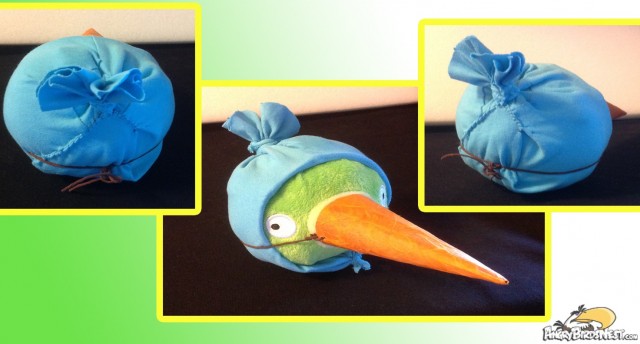
Buy an inexpensive blue t-shirt for a baby/toddler/infant. Try to get one without any logos or pictures on it. Look for sales, clearance racks or to second-hand stores to save money. The smaller the better. Bring your piggie in for sizing if you can. Stick your pig’s face through the neck hole of the shirt to size it. Tuck the ribbed portion of the neck inside all the way around. If the shirt is too big, you may need to cut it at the bottom and sew it together to get a better size.
Pull the excess fabric from the bottom of the shirt and sleeves up from the back and cut it off, leaving two or three inches to use as the topknot. From the pieces you cut, cut a small strip and tie it off at the top tightly. Use scissors to trip the topknot to match Piggy McCool’s look.
Pro Tip: Whether you use a sewing machine or hand sew, your skill level will not matter. Piggies are not very precise in their construction, so the more “Frankenstein” looking the cowl, the more realistic it will look.

Cut two matching circles from the white fabric and sew them together. I suggest hand sewing these as they are very small. Before you close them up, stuff with poly-fil. You can use cotton balls in a pinch, but poly-fil is best. Over stuff, so you have good, packed eyes. Tie a big knot in a length of black yarn. Thread the other side in a large needle, and going from the inside of the cowl, poke the needle through the t-shirt, then completely through one eye. Pull tight and tie a knot in the other side to hold the eyeball down. Keep knotting until you have a good sized pupil for your eye. This will keep it on the costume, as well. Repeat the entire process for the other side.
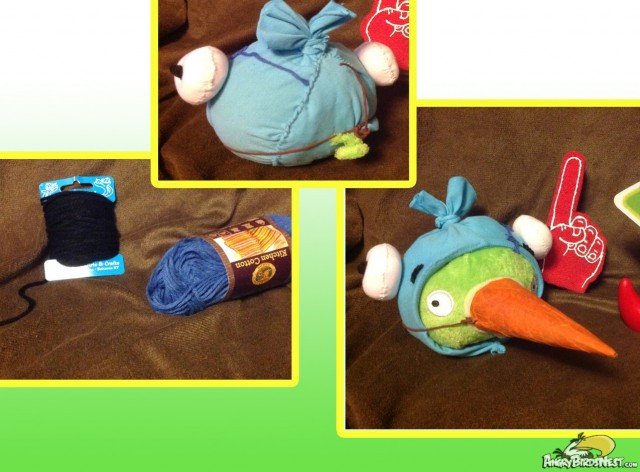
Lastly, the stitching. Logic would say to just sew the blue yarn in a stitch pattern, but depending on your fabric, this may make an overly large hole in your fabric. I opt-ed to just use glue. I cut the thread to length, glued along the yarn, then placed it where I want it on the t-shirt. I also took two small lengths of black yarn and glued them on as his eyebrows.
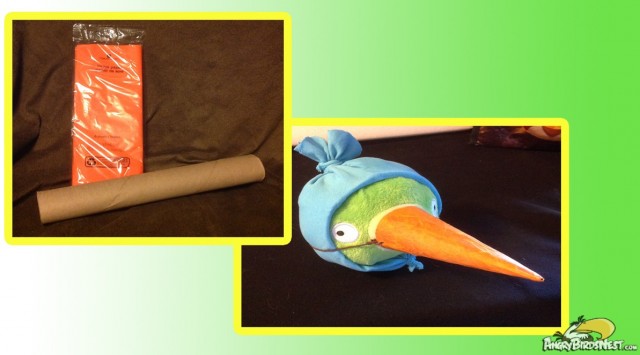
For the beak, cut a paper towel cardboard tube in the shape of the beak. Make a mixture of Elmer’s or craft glue and water. Paint the cardboard beak with the glue/water mixture. Rip strips of orange tissue and lay them over the wet cardboard. Paint another layer, put more tissue. Continue for about 3 or 4 layers, or until your beak looks covered and to your liking. Wait for it to dry.
While it is drying, if you don’t have any brown string, you can cut a length of your blue string and coat it in brown acrylic paint (or mix red, yellow and blue together, then add white or black to lighten or darken).
Once both have dried, poke two small holes in each side of the beak. Cut the brown (or painted brown) yarn in half. Tie it to each of the holes, fit on your pig plush, then tie it in the back to ensure a good snug fit.
Pro Tip: Don’t skip the drying. Make sure everything is completely dry or you may up with glue or paint on your plushie.
While the tail is not needed, you can see it in Angry Birds Epic. If you want to go the extra mile and include it, get some green furry fabric and fold it over about half to 2/3 of a paper clip, bent straight. Sew it together, then bend the furry paperclip in a coil shape. To attach, I just pushed hard on the exposed wire half of the paperclip and it punctured the t-shirt and the plushie. If you can, try to bend the paperclip that is inside the plush to help keep it on.
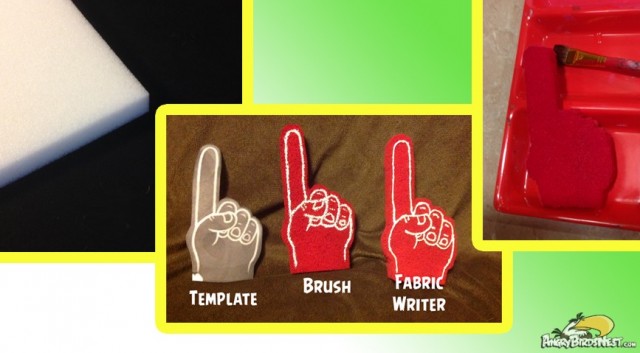
For the foam finger, again you don’t need it, but it adds a nice touch of detail. Get a foam rubber sheet and cut out the foam finger shape. I took a screen capture from the game, blew it up in Photoshop, then printed it out. I cut the finger shape out and traced around it on the foam. The paint will not cover pen marks, so use a light color or make sure you cut it off when you cut out the foam.
Foam is hard to work with, so you will need to trim it up, mostly likely. I used the scissors facing straight up and made small snips to get things even and level. Once you are satisfied, make a mixture of red acrylic paint and water. Not like the glue. For this, if you get too much water, you won’t get much color. You will need a lot of paint. Apply, by dabbing the brush in the paint, then pressing in to the foam. Continue till the entire finger is red. You may need to squeeze the foam rubber to make sure the paint is saturating and not just staying on the surface. Note: this WILL get your hands full of paint. Once the finger is fully saturated, put somewhere to dry. Preferably not something like newspaper, as the fresh paint will stick to it.
Once dry, use the image you printed earlier as a guide to paint the white detail on to the foam finger. I have found that using Scribbles brand 3-D Dimensional Fabric Paint is best. The applicator leaves a fine bead. You can hand paint it, but the Scribbles is much easier to use. Draw the pattern on the finger using the printed image as a guide. For display, use a Popsicle stick, or other object to hold it up.

For bonus detail, I took a screenshot of Piggy’s “Special Offer” sign and printed it large, then cut around the white border. I was lucky enough to find a chili pepper picture holder so it looks like Piggy has the Rage Chili.
And that’s about it. All that’s left is to display it, take pics and post them to the Internet and Pinterest!
If you decide to build one, be sure to post your results here on Angrybirdsnest.com Are you a crafty Angry Birds fan? Are there any other custom plush builds you’d like to see? Any other type of build diaries you’d like to see? Share your thoughts in the comments below.


